Download Tutorial Lengkap (PDF 963 KB)
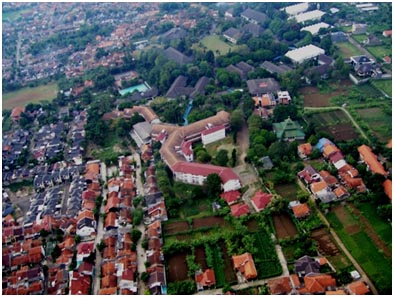
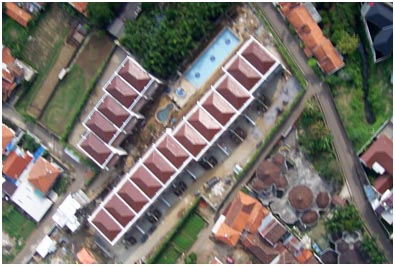
UAV to take AERIAL PHOTOGRAPH
FIRST TIME IN AERIAL PHOTOGRAPH
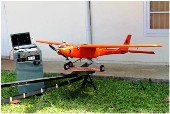
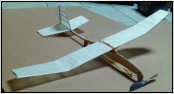
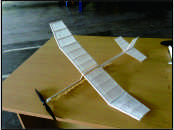
The AVIATECH DART PRO3 UAV is equipped with hi-tech system to have low cost - high resolution - low altitude aerial photograph for relatively small area. The result of the aerial photograph is depend to the experience of the “man behind the gun” i.e the operator who control the UAV. More difficult aerial photograph such hill area or taking orthophoto will requires more experienced crew to take (numbers) of best shoot photo at specific location with specific intervals.
Sometime, due to environment and condition, aerial photograph should be taken several time, 2 or 3 time repeatedly fly over the same or cross area to have the best photo taken. For the first time in aerial photograph, the following are some tips need to be taken into considerations before flying.
1.1 Choose the Right Period
The landscape can look completely different depending on the season. Spring and autumn usually offer the most colourful pictures. They are the perfect time to capture fields in flower or orange-coloured forests.
Winter is interesting if you have the chance to fly around a mountainous area. However, any plain under snow can look even more flat and monotonous.

It is also important to choose the right time of the day and, more specifically, to check the position of the sun in the sky. Because of the altitude, the risk of dazzle increases in late afternoon when the sun is low in the horizon. The sunset can offer spectacular views but with extreme contrasts between the sky and the land making it very difficult to capture.
1.2 The Advantages and Disadvantages of Cloudy or Sunny Weather
Unless within a very tight schedule, you probably won’t have the opportunity to postpone the date of your flight and wait for the perfect weather. Do not be too disappointed if you are not flying in a perfect blue sky, you can always take advantage of a cloudy sky.
Of course, sunny days provide in most cases the brightest pictures and accentuate the details of the ground. However, even when the weather on the ground is perfectly clear, you can encounter haze with altitude, significantly reducing your visibility and misting over your pictures.
An overcast sky inevitably reduces the light on the ground, tarnishing the pictures, but can also provide the right conditions for dramatic photos
1.3 Choose the Right Optic
The first thing to consider when choosing your optic is that you will most likely use the same lens during the whole flight. The movement of the aircraft, the turbulence, and the confined space will discourage you from changing your lens when on board.
The choice of the lens depends on your preferences; whether you like close-up pictures or panoramic views. To help you make your decision, here are the advantages and disadvantages of the each type of lenses:
Telephoto zoom lens:
Necessary if you want to get very close to the ground and isolate your subject, but need to be ensured it is not overweight.
Wide-angle lens:
Great to capture a landscape or a sea of clouds and ideal for panoramic views.
Zoom lens:
Great for a first aerial photography experience, enabling you to try several different compositions during the flight: from stunning panoramic landscapes to close-up images.
Prime lens:
It is well known that prime lenses take sharper photographs. However, I would only recommend you use a prime lens if you have already done aerial photography and want to challenge your skills.
1.3 Prepare the Flight
Good preparation will save you precious time, since you only have few seconds to get the right picture. Here is some advice for your preparation:

1. Make a list of the spots that you plan to shoot (monuments, stadiums, lakes, castles, airfields, etc.)
2. Mark them on a map. If you do not have aeronautical map, use a normal map
3. Have a look at the satellite view on Google map. From above, some spots will look closer than you think.
If you do your homework, you should be able to guess during the flight the position of the aircraft from the different spots, and from which side you will shoot. During the flight, keep an eye on motorways, railways, roundabouts, lakes, woods, towns, etc., as they are the best localization marks.
By doing this, you should have some time to test your camera settings before you arrive right above the spot.
2. AERIAL PHOTOGRAPH ACTIVITY
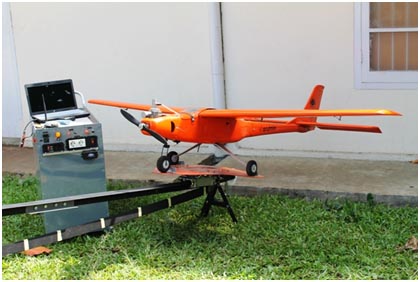
The AVIATECH DART PRO3 UAV is equipped with Auto Pilot, instruments and also radio to have the UAV fly using preprogrammed flight directions. To have all system working as required to conduct aerial photograph, the following are typical aerial photograph activity which may be applied in each time aerial photograph.
2.1 Crew / Operator
To handle Aerial Photograph using Dart Pro 3 UAV it is requires least 2 (two) operator, i.e :
a. Pilot: His/her duty is to fly the Dart Pro3 UAV remotely using Portable Ground Control Station or directly using Radio Control, through the Planned flight direction from point 1st, to 2nd up to last point and land the UAV safely.
b. Photographer: His/Her duty is to take aerial photograph remotely using Portable Ground Control Station at exactly point location of photograph taking and with precise taking intervals.
The best practice is if there is a technician or helper :
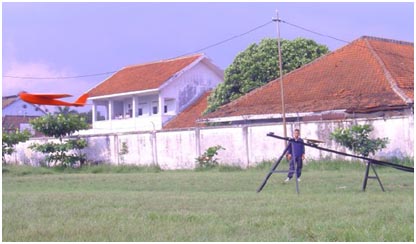
c. Technician: His/Her duty is to help pilot/photographer to prepare technical issue such as fill in fuel, prepare catapult launch, etc.
2.2 Base Camp Preparation
1. Prepare and charging of On board Battery for Camera, FDR, GPS Photo Tagger.
2. Checking and Reserve Memory Allocation for Photo Camera, FDR, GPS Photo Tagger.
3. Time Syncronization of Photo Camera, GPS Photo Tagger, and Ground Station PC.
4. Proper Installation of Photo Camera, GPS Photo Tagger on Board, Pico Switch.
5. Trial Photo Taking using R/C or Servo Driver, Turn off system for moving to Location.
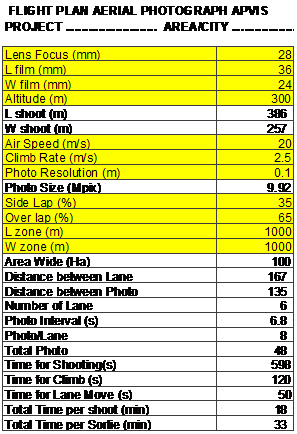
6. Run Flight Plan for Aerial Photo to get altitude, time interval, flight lane interval. The following form may be used and helpfull during the flight
2.3 On Location
7. Turn on Rx system, Camera, GPS Tagger make sure every things is working normally
8. Inform Pilot of Mission Altitude e.g 300m above ground level (barometric altitude) , or GPS altitude 1000m above sea level.
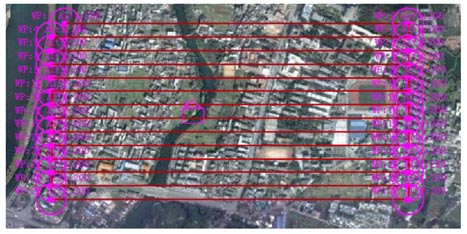
9. Inform pilot of Flight Lanes, areal boundary of target
10. Take photos on mission altitude and targeted flight lanes or at pilot discretion
11. Down loading data FDR, Photo Camera and GPS Tagger to GS PC.
2.4 Return to Base Camp
12. GPS Photto Tagging
13. Preparre altittude Photo List
14. Iso Altitude Photo Transformation
15. Background Map preparation
16. Photo Mosaiking
17. Geo Referencing
18. Print Photo Mapping
to be continued...